
Download Our DIY Information Sheets
We are pleased to be able to provide our customers with DIY information sheets for many small building projects. These DIY information sheets help with design and construction and can be easily understood by all budding carpenters. Now available in traditional treated timber or Cherrypine™. Click the selected DIY project on the right to download the pdf. If you do not have Adobe Acrobat Reader, click on the button below to download it for free.
Rounds as Post Design Guide
Sleepers as Posts Design Guide for Wall Heights 0.3M to 0.9M
Installation Notes
Cutting or docking of sleepers may expose untreated heartwood. All cut surfaces should be coated with CN Timber Oil or CN Emulsion. Wherever possible, avoid placing cut ends in ground contact. Use hot dipped galvanized steel fasteners (or fasteners of higher corrosion resistance) in all cases. Australian United Timbers can be painted or stained if required.
Product Options
Australian United Timbers landscape sleepers are available in all common sleeper sizes and lengths. Contact us if you require special sizes or profiles. Landscape sleepers are normally treated to H4 level (ground contact) as defined by AS1604. For critical structural use, H5 level treatment can be offered. Contact us for further details. Australian United Timbers offers landscape sleepers with either traditional Tanalised® CCA treatment or the EcoWood® treatment.
Disposal
CCA treated timber is not a hazardous waste. Trade and domestic users should dispose of off-cuts and redundant pieces through normal waste collection services. Treated timber off-cuts and waste should NOT be burnt.
Safety
The chemicals used to preservative treat Australian United Timbers landscape sleepers have been registered for use with the Australian Pesticides and Veterinary Medicines Authority (APVMA) and provide protection against attack from termites and decay. However, appropriate safety precautions should be taken when working with the product particularly when machining or performing other operations where wood dust is generated. Safety Data Sheets and handling guidelines are available for further information.
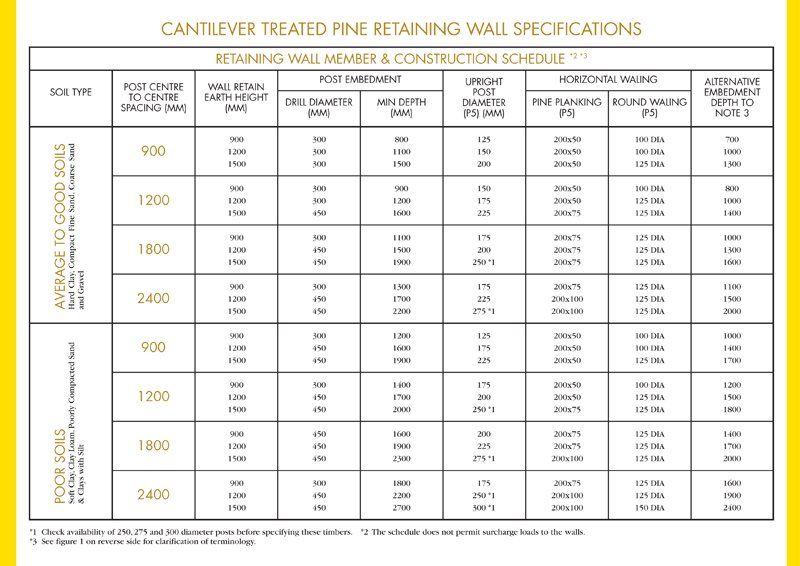
Designing the Wall
Step 1: Wall Selection Criteria for Embedment Depth
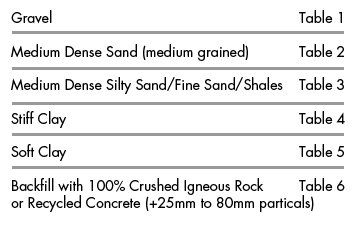
- Select the correct design table by identifying the backfill/subgrade type.
- Decide on the height of the wall.
- Check the table you have selected to find out the range of post spacings. Choose the most suitable post spacing.
- You now have the soil type, wall height, post spacing and embedment depth for your sleeper posts.
Step 2: Soil Parameters
The formulation of the cantilever log retaining wall design sheets has been undertaken based on the following soil parameters:
Step 3: Backfill Slope
The information on the tables has been based on a horizontal backfill slope only. For backfill slopes beyond this amount, engineering advice should be obtained.
Step 4: Horizontals (Waling)
See above table for waling information.
Step 5: Installation Notes
Wherever possible, place uncut ends into the ground. Where this is not practical (eg. trimmed posts or wales), coat the ends well with CN emulsion or CN oil or equivalent.
Relevant Standards for This Type of Wall
- AS1170.0-1989 Minimum design loads on structures, part 1: Dead and Live loads and load combinations.
- AS1720.1-1997 Timber structures, Part 1: Design Methods
- AS1604 – Timber – preservative treated – sawn and round. These tables were compiled by Cardno MBK (NSW) Pty Limited consulting civil/structural engineers. The information provided for guidance purposes only in the design of retaining walls. If in doubt about the interpretation of the tables or the nature of the soil combinations at the site, please seek expert advice.